Zwe Hlaing Bwa

စိတ်ကူးတည့်ရာရေးထားသော ဘလော့ခ်

EtherChannel Tutorial

Posted by Zwe Hlaing Bwa on July 19, 2020


Port Aggregation Protocol (PAgP)

PAgP dynamically negotiates the formation of a channel. There are two PAgP modes:

Auto Responds to PAgP messages but does not aggressively negotiate a PAgP EtherChannel. A channel is formed only if the port on the other end is set to Desirable. This is the default mode.
Desirable Port actively negotiates channeling status with the interface on the other end of the link. A channel is formed if the other side is Auto or Desirable.

The table below lists if an EtherChannel will be formed or not for PAgP:

PAgP Desirable Auto
Desirable Yes Yes
Auto Yes No

Link Aggregation Protocol (LACP)

LACP also dynamically negotiates the formation of a channel. There are two LACP modes:

Passive Responds to LACP messages but does not aggressively negotiate a LACP EtherChannel. A channel is forms only if the other end is set to Active
Active Port actively negotiates channeling with the interface on the other end of the link. A channel is formed if the other side is Passive or Active

The table below lists if an EtherChannel will be formed or not for LACP:

LACP Active Passive
Active Yes Yes
Passive Yes No

In general, Auto mode in PAgP is the same as Passive mode in LACP and Desirable mode is same as Active mode. Auto = Passive Desirable = Active

https://www.9tut.com/etherchannel-tutorial

Posted in CISCO, IT Knowledges | Leave a Comment »

PAgP configuration (Cisco)

Posted by Zwe Hlaing Bwa on July 12, 2020


Technology: Switching
Area: Link aggregation
Vendor: Cisco
Software: 12.X , 15.X
Platform: Catalyst platforms

Port Aggregation Protocol (PAgP) is a Cisco proprietary protocol which is used for the automated, logical aggregation of Ethernet switch ports, known as an Ether Channel. There are two modes of PAgP:

  • Auto mode: it passively negotiates PAgP aggregation. If the remote end of the link is also configured with Auto mode, a PAgP EtherChannel will not form. Auto side is waiting for negotiation to start from the other end.
  • Desirable mode:that actively negotiates PAgP. The remote end must be configured in Auto or Desirable mode for a PAgP EtherChannel to form.

To configure interface to talk actively with PAgP packects (desirable mode):

Switch#configure terminal
Switch(configure)#interface range f0/1 - 2
Switch(configure-if-range)#channel-group 5 mode desirable
Switch(configure-if-range)#end

To verify if the ether channel is formed use following show command:

Switch#show ethernet channel summary

To configure interface to wait with PAgP to respond to PAgP packets from other end (auto mode):

Switch#configure terminal
Switch(configure)#interface range f0/1 - 2
Switch(configure-if-range)#channel-group 5 mode auto
Switch(configure-if-range)#end

To verify if the ether channel is formed using following show command:

Switch#show ethernet channel summary

PAgP configuration (Cisco)

Posted in CISCO, IT Knowledges | Leave a Comment »

LACP mode configuration (Cisco)

Posted by Zwe Hlaing Bwa on July 12, 2020


Technology: Switching
Area: Link aggregation
Vendor: Cisco
Software: 12.X , 15.X
Platform: Catalyst platforms

Link Aggregation Control Protocol IEEE 802.3ad (LACP) is an open standard of Ethernet link aggregation. LACP allows Cisco switches to manage Ethernet channels between switches that conform the 802.3ad protocol. You can configure maximum 16 ports to form a channel depending on IOS version and platform. Eight of the ports are in active mode and the other eight are in hot-standby mode. There are few LACP modes: “active”, “passive” and “on”.

First, to configure logical etherchannel interface:

Switch#configure terminal
Switch(config)#interface port-channel 5
Then you need to assign the physical ports and specify LACP mode.

LACP mode Active:

LACP mode that places a port into an active negotiating state, in which the port initiates negotiations with other ports by sending LACP packets.

To configure port as an LACP active mode:

switch# configure terminal
switch(config)# interface fastethernet 0/1
switch(config-if)# channel-group 5 mode active

To verify if ports are bundled:

Switch#show ethernet channel summary

LACP mode Passive:

LACP mode that places a port into a passive negotiating state, in which the port responds to LACP packets that it receives but does not initiate LACP negotiation.

To configure port as an LACP active mode:

switch# configure terminal
switch(config)# interface fastethernet 0/1
switch(config-if)# channel-group 5 mode paasive

To verify if ports are bundled:

Switch#show ethernet channel summary

LACP mode On:

All static EtherChannels, that is, the port is not running LACP messaging but static bundling. With this mode the switch or the other end switch will not recognize any problem with ether channel and will not tell about problem.

switch# configure terminal
switch(config)# interface fastethernet 0/1
switch(config-if)# channel-group 5 mode on

To verify if ports are bundled:

Switch#show ethernet channel summary

Posted in CISCO, IT Knowledges | Leave a Comment »

Cisco 3560 password recovery enabled procedures

Posted by Zwe Hlaing Bwa on July 11, 2020


type this for password recovery.

switch: flash_init
switch: load_helper
switch: rename flash:config.text flash:config.old
switch: boot

after the switch boots and you are at the enable prompt, type this:

switch# rename flash:config.old flash:config.text
Switch# copy flash:config.text system:running-confi

Posted in CISCO, IT Knowledges | Leave a Comment »

ခင်ပွန်းကြီး (၁၀) ပါးတို့အပေါ် ပြစ်မှားမိသည်များကို ဝန်ချတောင်ပန်း၍ ဝဋ်ကြွေးချေခြင်း

Posted by Zwe Hlaing Bwa on July 3, 2020


မြတ်စွားဘုရား ဘုရားတပည့်တော်သည် အနမတ္တဂ္ဂ သံသရာမှာစ၍ ယခုဘဝ ယနေ့တိုင်အောင် မသိ-မလိမ္မာပါသဖြင့် လည်းကောင်း၊ တွေဝေ-မိုက်မှားမိပါသဖြင့်လည်းကောင်း၊ ခင်ပွန်းကြီး (၁၀)ပါး ဖြစ်သော-

(၁) မြတ်စွာဘုရား

(၂) ပစ္စေကဗုဒ္ဒါ

(၃) လက်ဝဲရံ၊ လက်ယာရံ ရဟန္တာကြီးများ

(၄) ရဟန္တာ အရှင်သူမြတ်များ

(၅) မိခင်

(၆) ဖခင်

(၇) မိမိထက် အသက်၊ သိက္ခာ၊ ဂုဏ်နှင့် သီလ၊ သမာဓိ၊ ပညာဂုဏ် ကြီးသူများ

(၈) မိမိအား သွန်သင်ဆုံးမပြီး၊ အတန်းပညာနှင့် အသက်မွေး ဝမ်းကြောင်းပညာ သင်ကြားပေးခဲ့ကြသော သင်ဆရာမြတ်၊ မြင်ဆရာမြတ်နှင့် ကြားဆရာမြတ်များ

(၉) မိမိအကျိုးငှာ ကူညီထောက်ပံ့-စောင့်ရှောက်ပးခဲ့ကြသည့် ဇနီးသည်/ခင်ပွန်းသည်/ဦးလေး/အဒေါ်/အစ်ကို/အစ်မနှင့်တကွ ကျေးဇူးပြုဖူးသူများ၊

(၁၀) ကမ္မဌာန်းနည်းပြ ဆရာများတို့အပေါ်ဝယ် ကာယကံအပြစ်များ၊ ဝစီကံမှု အပြစ်များနှင့် မနောကံအပြစ်များသည်၊ မလွဲမသွေ ရှိကိုရှိခဲ့ပါကြောင်း ဝန်ခံအပ်ပါသည် အရှင်ဘုရား။

  1. ထိုအပြစ်များကို ပျောက်ပါစေခြင်းအကျိုးငှာ၊ ရိုသမြတ်နိုး၊ လက်အုပ်မိုး၍ ရှိခိုး တောင်းပန်ပါ၏ အရှင်ဘုရား (တစ်ကြိမ် ဦးချပါ)
  2. ထိုအပြစ်များကို ပျောက်ပါစေခြင်းအကျိုးငှာ၊ ရိုသမြတ်နိုး၊ လက်အုပ်မိုး၍ ရှိခိုး တောင်းပန်ပါ၏ အရှင်ဘုရား (တစ်ကြိမ် ဦးချပါ)
  3. ထိုအပြစ်များကို ပျောက်ပါစေခြင်းအကျိုးငှာ၊ ရိုသမြတ်နိုး၊ လက်အုပ်မိုး၍ ရှိခိုး တောင်းပန်ပါ၏ အရှင်ဘုရား (တစ်ကြိမ် ဦးချပါ)

Posted in Religion | Leave a Comment »

VTP

Posted by Zwe Hlaing Bwa on July 2, 2020


VTP Minimum requirements
– All switches in same VTP Domain
– Switches connected via VLAN Trunks
– Same VTP Password
– Same version of VTP must communicate across a link

VTP Authentication
– VTP v3 still supports use of VTP Passwords
– VTP Password are never displayed in running-config (same as VTP v1 and v2)

Three options for entering a VTP password
vtp password cisco
do show vtp password

vtp password cisco hidden (Device is operating in VTP version 1. hidden option is allowed from VTP version 3 only.)
do show vtp password
VTP Password: 52C518C46CE6647155DE01304CECA63E

on the another SW -> vtp password 52C518C46CE6647155DE01304CECA63E secret (Device is operating in VTP version 1. secret option is allowed from VTP version 3 only.)
do show vtp password
VTP Password: 52C518C46CE6647155DE01304CECA63E

VTP v3 Servers

Secondary Server (default)

  • Similar to VTP Client: Does not allow manual addition/deletion of VLANs
  • Not allowed to update VLAN database of other devices

Primary Server

  • Only one per VTP Domain
  • Only device in Domain allowed to update VLAN Database of other devices
  • Only device upon which VLANs may be added/removed manually

Configuration

  • Configure VTP Domain Name
  • Change mode to VTP version 3
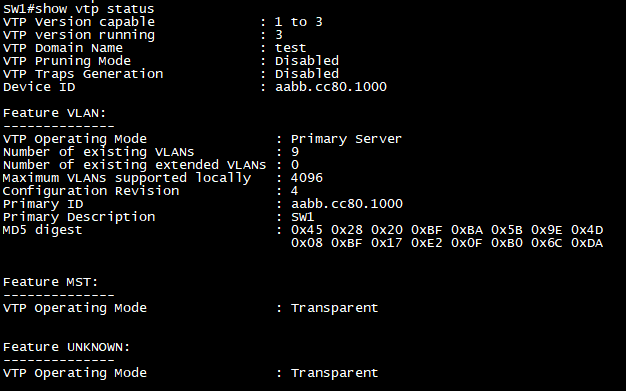
  • Configure one switch as VTP Primary Server
  • Configure VTP Password (optional)

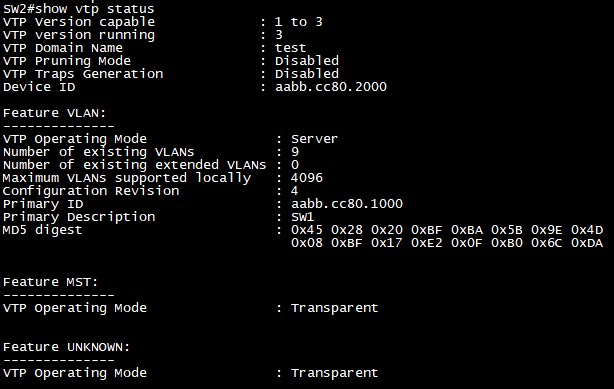
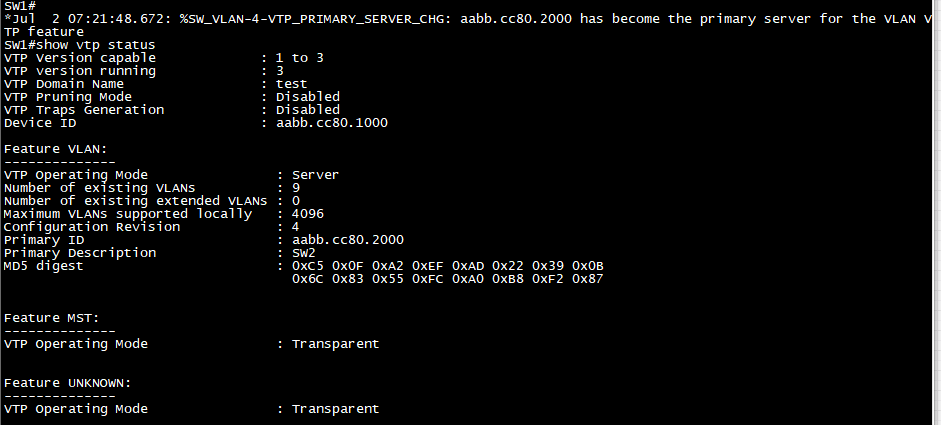
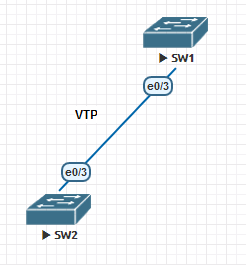
SW2 take over VTP Primary Server Role from SW1

Posted in CISCO, IT Knowledges | Leave a Comment »

လက်ထားနည်း (၆)နည်း

Posted by Zwe Hlaing Bwa on June 30, 2020


၁။ ညာဘက်လက်ဖမိုးကို ညာဘက်ဒူးပေါ်တွင်၄င်း၊ ဘယ်ဘက်လက်ဖမိုးကို ဘယ်ဘက်ဒူးပေါ်တွင် ၄င်း၊ သက်တောင့်သက်သာ တင်ထားပါ။

၂။ ညာဘက်လက်ဖဝါးကို ညာဘက်ဒူးပေါ်တွင်၄င်း၊ ဘယ်ဘက်လက်ဖဝါးကို ဘယ်ဘက်ဒူးပေါ်တွင် ၄င်း၊ သက်တောင့်သက်သာ တင်ထားပါ။

၃။ လက်နှစ်ဘက်ကို ဒူးနှစ်ဘက်စီသို့ ဆန့်တန်းပါ။ ညာဘက်လက်ကောက်ဝတ်ဖြင့် ညာဘက်ဒူးကိုချိတ်၍၊ ဘက်ဘက်လက်ကောက်ဝတ်ဖြင့် ဘယ်ဘက်ဒူးကို ချိတ်ထားပါ။

၄။ လက်နှစ်ဘက်ကို လက်မနှစ်ခုထိ၍ ရှေ့တည့်တည့်သို့ဆန့်တန်းပါ။ လက်ဖဝါးနှစ်ဘက်ကို ကြမ်းပျဥ်ပေါ်သို့ချပါ။ တံတောင်ကို လျှော့ချလိုက်ပါ။ တံတောင်သည် ခန္ဓာကိုဘေးနှစ်ဘက်တွင်ထိနေပါလိမ့်မည်။

၅။ နံပါတ် (၄) အနေအထားတွင် လက်ဖဝါးနှစ်ခုကို အနည်းငယ်စီ ချဲလိုက်ပါ။ ခြေသလုံးများပေါ်သို့ တင်နေပါလိမ့်မည်။

၆။ လက်ချောင်းများကို စိလိုက်ပါ။ ဘယ်ဘက်လက်ဖဝါးပေါ်သို့ ညာဘက်လက်ဖဝါးကို ထပ်လိုက်ပါ။ လက်မနှစ်ခုမှာ တစ်တန်းတည်းရှိနေပြီး မထိတထိအနေအထားတွင် ရှိနေပါလိမ့်မည်။ ထပ်ထားသောလက်ကို ရှေ့တွင် အလိုက်င့်လေးချလိုက်ပါ။ တံတောင်များကို ခန္ဓာကိုယ်တွင် ကပ်ထားရပါမည်။

Posted in interest | Leave a Comment »

ခြေထောက်ထားနည်း (၇)နည်း

Posted by Zwe Hlaing Bwa on June 30, 2020


၁။ လက်ယာဘက်ခြေထောက်ကို လက်ဝဲဘက်ခြေထောက်၏ရှေ့တွင် မဖိ၊ မထပ်အောင် ထားပါ။ လက်ဝဲဘက် ခြေမကို ဆုပ်ကိုင်၍ လှုပ်ခါကြည့်ပါက ခြေဖဝါးအလွယ်တကူလှုပ်ရှားနိုင်သည့် အနေအထားတွင်ရှိရပါမည်။

၂။ လက်ဝဲဘက်ခြေထောက်ကို လက်ယာဘက်ခြေထောက်၏ရှေ့တွင် မဖိ၊ မထပ်အောင် ထားပါ။ လက်ယာဘက် ခြေမကို ဆုပ်ကိုင်၍ လှုပ်ခါကြည့်ပါက ခြေဖဝါးအလွယ်တကူလှုပ်ရှားနိုင်သည့် အနေအထားတွင်ရှိရပါမည်။

၃။ လက်ဝဲဘက်ခြေထောက်ပေါ်သို့ လက်ယာဘက်ခြေထောက်ကို ထပ်၍တင်ထားရပါမည်။ ထပ်တင်ရာတွင် လက်ယာဘက်ခြေဖဝါးစောင်းသည် လက်ဝဲဘက် ဒူးကွေးထားသောနေရာတွင်တင်ထား၍ လက်ယာဘက်ဒူးသည်၊ လက်ဝဲဘက်ခြေဖဝါးပေါ်တွင် တင်နေရပါမည်။

၄။ လက်ယာဘက်ခြေထောက်ပေါ်သို့ လက်ဝဲဘက်ခြေထောက်ကို ထပ်၍တင်ထားရပါမည်။ ထပ်တင်ရာတွင် လက်ဝဲဘက်ခြေဖဝါးစောင်းသည် လက်ယာဘက် ဒူးကွေးထားသောနေရာတွင်တင်ထား၍ လက်ဝဲဘက်ဒူးသည်၊ လက်ယာဘက်ခြေဖဝါးပေါ်တွင် တင်နေရပါမည်။

၅။ ညာဘက်ဒူးကို ခွေ၍ ရှေ့တွင်ထားပြီး ဘယ်ဘက်ဒူးကို ကွေး၍ ခန္ဓာကိုယ်၏ဘယ်ဘက်တွင် ထားရပါမည်။

၆။ ဘယ်ဘက်ဒူးကို ခွေ၍ ရှေ့တွင်ထားပြီး ညာဘက်ဒူးကို ကွေး၍ ခန္ဓာကိုယ်၏ညာဘက်တွင် ထားရပါမည်။

၇။ ဘယ်ဘက်ဒူးကို ခွေ၍ ဘယ်ဘက်ခြေဖမိုးကို ညာဘက်ပေါင်ပေါ်တွင် တင်ပါ။ ညာဘက်ဒူးကိုကွေး၍ ဘယ်ဘက်ခြေသလုံးပေါ် ဖြတ်တင်ပြီး ညာဘက်ခြေဖမိုးကို ဘယ်ဘက်ပေါင်ပေါ်တွင်တင်ရပါမည်။

Posted in interest | Leave a Comment »

ထိခြင်း (၅) ပါးဖြင့် ဘုရားရှိခိုးခြင်း

Posted by Zwe Hlaing Bwa on June 30, 2020


က ။ ခြေ၊ လက်၊ တံတောင်၊ ဒူး၊ နဖူး၊ ကြမ်းနှင့် ထိရမည်။
ခ ။ ခြေထောက်ထိပါ၊ လက်ထိပါ၊ တံတောင်ထိပါ၊ ဒူးထိပါ၊ နဖူးထိကာ ဦးချပါ။
ဂ ။ ထိခြင်း (၅) ပါးဖြင့် ကန်တော့ရန်အတွက်

ဂ-၁ ။ ပုဆစ်တုတ်၍ ထိုင်လိုက်ပါ။

ဂ-၂ ။ လက်ဖဝါးနှစ်ဘက်ကိုပူး၍ ကြဖူးပုံသဏ္ဌာန်ဖြစ်ရန်အတွက် လက်မနှစ်ခုကို ယှဥ်လျက်ကပ်ထားပြီး လက်ဖဝါးနှင့် လက်ချောင်းများကို ဖူးဖူး၊ လုံးလုံး၊ ခုံးခုံးလေး ထားလိုက်ပါ။

ဂ-၃ ။ တံတောင် (၂) ဘက်ကို ကိုယ်ခန္ဓာဘေး (၂) ဘက်တွင် ထောက်ထားလိုက်ပါ။

ဂ-၄ ။ “ရိုသေမြတ်နိုး လက်အုပ်မိုး၍” ဟု ရွတ်ဆိုသည်နှင့် တစ်ပြိုင်နက် လက်မများ၏ အဆစ် (၂)ဆစ်ကြားနေရာကို မျက်ခုံး(၂)ခုကားနေရာနှင့် ထိလိုက်ပါ။

ဂ-၅ ။ “ရှိခိုးပါ၏ မြတ်စွာဘုရား” ဟု ဆိုသည်နှင့် တစ်ပြိုင်နက်၊ လက်နှစ်ဖက်ကို ကြမ်းပြင်ပေါ်သို့ ယှဥ်လျက်ချလိုက်ပါ၊ လက်နှစ်ဖက်ကို နဖူးဝင်သာအောင် အနည်းငယ်ခွဲလိုက်ပါ။ ခန္ဓာကိုယ်ကို ရှေ့သို့ညွှတ်၍ တင်ပါးကိုကြွပြီး၊ နဖူးကို လက်ဖမိုး(၂)ခုခွဲထားသည့်ကြမ်းပြင်ပေါ်သို့ထိရပါမည်။

Posted in Religion | Leave a Comment »

Juniper – Log In

Posted by Zwe Hlaing Bwa on June 28, 2020


Logging In for the First Time

After installing the SRX Series device, log in as the root user. There is initially no password for the root user. After you initially log in as root, the shell prompt (%) appears. Enter cli at the prompt to start the CLI and enter operational mode. The operational mode prompt is the right angle bracket (>).

To log in for the first time:

Amnesiac (ttyd0)

login: root
  1. At the login prompt, log in as root.
  2. At the shell prompt, enter cli.

root@% cli

The CLI is started in operational mode.

root> 

There is initially no password for the root user, it is required that you set a password for the root user so that you can log in as superuser and gain root-level access to the device and commit the configuration changes that you make.  If the root password is not set, you will not be able to commit any configurations.  For more information, see Configuring the Root Password.

Logging In as Non-Root Users

Non-root users automatically enter the CLI operational mode after logging in to the SRX Series device.

At the login prompt, enter the username (in this example, user) and the password (does not appear when typing).

Amnesiac (ttyu0)

login: user
Password:

— JUNOS 17.3R1.10 built 2017-08-23 06:40:27 UTC
user>

The prompt changes to username@host>, where username is the name of the user logged in, and host is the hostname for the device.

Logging in as the Root User

After logging in, the root user must start the CLI from the shell.

To log in as root user:

  1. At the login prompt, enter root.
  2. Amnesiac (ttyu0)login: root
    Password:

    — JUNOS 17.3R1.10 built 2017-08-23 06:40:27 UTC
    root%

  3. At the prompt, enter cli.
root% cli

The CLI is started in operational mode.

root>

Note: After logging out of the CLI, be sure to exit the shell so that no unauthorized users can access the device.

Posted in IT Knowledges, Juniper | Leave a Comment »